Connect Android Device With PC In USB Debugging Mode To Run Appium Test
You need to connect real android device with PC in USB debugging mode in order to run android app automation tests in real android device using appium. Later on we will also learn how to run android app test in virtual device. First we will use actual android device which is connected with PC in USB debugging mode to run test. So you must know how to enable USB debugging mode in android device and connect with your PC.
Enable Developer Option In Android Device
Previously if you have not enabled "developer options" in your android device then once you need to enable it in order to switch device in USB debugging mode. Otherwise you can not access USB debugging mode in your device.
Verify Developer Option Is Enabled?
To check Developer Option is enabled or not,
- Go to Settings.
- Check if there is any option like "Developer Option"?
If Developer Option is enabled then it will display there. Otherwise follow the steps given bellow to enable it.
Enable Developer Option
To enable Developer Option in android device,
- Go to Settings.
- Scroll down to bottom and tap on About Phone.
- Scroll down bottom again on About Phone screen. You will see option Build number.
- Tap seven times on Build number option one by one. After 3 tap, It will start showing you message like.. "You are now 2 steps away from being a developer" as shown in bellow image.
- After 7 times Build number option tap, It will show you message "You are now a developer!" as shown in bellow image.
- Now go back to Settings and scroll down bottom.
- You will see option Developer Options above About Phone as shown in bellow image.
Connect Device With PC And Start USB Debugging Mode
Note : Let me warn you before enabling USB debugging mode in your android device. Enable USB debugging only when you need it. Leaving it enabled all the time is kind of a security risk as it allows high-level access to your android device. So disable it immediately when you have not any usage of it.
To start USB Debugging mode,
- Connect your device with PC using USB cable.
- Go to Settings -> Developer options.
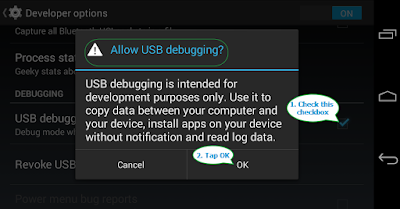
- There will be option USB debugging with check box. Check it.
- It will ask you to "Allow USB debugging?". Tap on OK.
It will enable USB debugging mode for your android device.
Verify Device Connected Properly With PC
To verify device is connected properly with PC with USB debugging mode,
- Open command prompt in your PC.
- Run command adb devices.
It will show you list of connected devices with your PC. If not display any device in list that means there is some issue with device connection or USB debugging mode is not enabled properly.
Note : If face any issue in android device detecting with PC, Please install PDANet+ for Android in your system as described in THIS POST.
Note : If face any issue in android device detecting with PC, Please install PDANet+ for Android in your system as described in THIS POST.
This is the way to enable developer mode and USB debugging mode in your android device to connect it with PC in development environment. Now you can run native apps automation test in physical devices using appium and selenium webdriver. We will learn it in my upcoming posts. Next post will show you how to locate different elements of android native app using uiautomatorviewer.


No comments:
Post a Comment