| Happiness | |
| Happiness is not anywhere outside. It is in our fixing the attention, in the steadiness of disposition, and in the withdrawal of our mind. Those who know this secret need not search for happiness outside. | |
Tuesday, 31 January 2017
Happiness
Illusion
| Illusion | |
| Happiness in itself is real existence. Really speaking, happiness alone exists, and all else, namely sorrow etc., is nothing but illusion. | |
Monday, 30 January 2017
google sdk- command line for big query
Welcome to the Google Cloud SDK! Run "gcloud -h" to get the list of available co
mmands.
---
Welcome to BigQuery! This script will walk you through the
process of initializing your .bigqueryrc configuration file.
First, we need to set up your credentials if they do not
already exist.
BigQuery configuration complete! Type "bq" to get started.
C:\Program Files (x86)\Google\Cloud SDK>bq ls
datasetId
--------------------
trail_dataset_krvy
C:\Program Files (x86)\Google\Cloud SDK>bq ls trail_dataset_krvy
tableId Type
---------- -------
test TABLE
testGcs1 TABLE
C:\Program Files (x86)\Google\Cloud SDK>bq mk cmdCreate
Dataset 'trail-project-1-vishnuyardini:cmdCreate' successfully created.
C:\Program Files (x86)\Google\Cloud SDK>bq ls
datasetId
--------------------
cmdCreate
trail_dataset_krvy
C:\Program Files (x86)\Google\Cloud SDK>bq load cmdCreate.cmdTable export.csv sn
o:string,content:string
BigQuery error in load operation: Source file not found: export.csv
C:\Program Files (x86)\Google\Cloud SDK>bq load cmdCreate.cmdTable export.csv sn
o:string,content:string
Upload complete.
Waiting on bqjob_r6d606f52_00000159ee65c15e_1 ... (1s) Current status: DONE
C:\Program Files (x86)\Google\Cloud SDK>bq ls cmdCreate
tableId Type
---------- -------
cmdTable TABLE
C:\Program Files (x86)\Google\Cloud SDK>bq show cmdCreate.cmdTable
Table trail-project-1-vishnuyardini:cmdCreate.cmdTable
Last modified Schema Total Rows Total Bytes Expiration
----------------- -------------------- ------------ ------------- ------------
30 Jan 13:32:54 |- sno: string 11 75
|- content: string
C:\Program Files (x86)\Google\Cloud SDK>bq query "select * from cmdCreate.cmdTab
le";
Waiting on bqjob_r321aacff_00000159ee753983_1 ... (0s) Current status: DONE
+-----+---------+
| sno | content |
+-----+---------+
| num | content |
| 1 | J |
| 2 | I |
| 3 | H |
| 4 | G |
| 5 | F |
| 6 | E |
| 7 | D |
| 8 | C |
| 9 | B |
| 10 | A |
+-----+---------+
Friday, 27 January 2017
pip in windows-python
use:
python -m pip
in windows pip is in script folder, so it is treat as module so "-m" is used
python -m pip
in windows pip is in script folder, so it is treat as module so "-m" is used
Monday, 23 January 2017
Extract files or unzip the tar files - python
import tarfile

# tar file to extract
theTarFile = 'D:\gcs task 1\suvi.gz'
# tar file path to extract
extractTarPath = 'D:\gcs task 1'
# open the tar filetfile = tarfile.open(theTarFile)
if tarfile.is_tarfile(theTarFile):
    # list all contents    print "tar file contents:"    print tfile.list(verbose=False)
    # extract all contents    tfile.extractall(extractTarPath)else:
    print theTarFile + " is not a tarfile."
read file based on range -python
import itertools

with open('C:\Users\Vishnuyardini\Documents\my goal.txt', 'r') as text_file:
    for line in itertools.islice(text_file, 5, 7):
        print line
to read enter file and based on line number - python
fileOpen=open('C:\Users\Vishnuyardini\Documents\my goal.txt','r')
print("file name...."+fileOpen.name)
#to read file based on line number
line= fileOpen.readline()
print "Read Line: %s" % (line)
#read line till eof
while True :
    line = fileOpen.readline()
    print line
    if ("" == line):
        print "file finished"        break
Google cloud platform - 1
APP ENGINE:
Google App Engine (often referred to as GAE or simply App Engine) is a platform as a service (PaaS) cloud computing platform for developing and hosting web applications.
STANDARD ENVIRONMENT:
for example if the code is developed in python 2.7 that should run and only support 2.7 not in 3.5
FLEXIBLE ENVIRONMENT:
for example if the code is developed in python 2.7 that can run in 2.7 and also in 3.5
COMPUTE ENGINE:
Google Compute Engine lets you create and run virtual machines on Google infrastructure.
Friday, 20 January 2017
TUPLE-LIST BASIC
QUESTION
Write a program which accepts a sequence of comma-separated numbers from console and generate a list and a tuple which contains every number.
INPUT:
Suppose the following input is supplied to the program: 45,69,78,33,12,98
OUPUT:
Then, the output should be:
['45', '69', '78', '33', '12', '98']
('45', '69', '78', '33', '12', '98')
STEPS I TRY:
1)Try to read input from console using raw input
2)Read about TUPLE(immutable object), from this i came to know what is tuple
3)Read about LIST, from this i came to know what is list and is functions
4)Did coding part
SOULTION 1 :
ConsoleValue=raw_input("Enter the number seprated by comma.. which to be displayed as tuple and list...")
singleValues = (ConsoleValue.split(","))
listValue=list(singleValues)
tupleValue=tuple(singleValues)
print(listValue)
print(tupleValue)
OUTPUT FOR SOLUTION 1:

DISADVANTAGES I FELT FOR SOLUTION 1:
1) memory usage for variables
SOLUTION 2:
ConsoleValue=raw_input("Enter the number seprated by comma.. which to be displayed as tuple and list...")
print(list((ConsoleValue.split(","))))
print(tuple((ConsoleValue.split(","))))
OUTPUT FOR SOLUTION 2:

ADVANTAGES I FELT FOR SOLUTION 2:
1)memory usage for variable is reduces
POSSIBLE INPUTS I TRIED:
1)INPUT IS NOT SEPARATES BY COMMA

2)INPUT ARE SERATED BY DOT(.)

3)INPUT JUST COMMA(,)

4)JUST ENTER AS INPUT:

Thursday, 19 January 2017
converting tsv to csv file-Python
import re
tsv = open('D:\csv to tsv\ggtsvFile.tsv', 'r')
csv = open('D:\csv to tsv\SampleCSVFile_2kb.csv', 'w')
for fileContent in tsv:
    fileContent = re.sub("\t", ",", fileContent)
    print(fileContent)
    csv.write(fileContent)
csv.close()
converting csv to tsv file-Python
import re
csv = open('D:\csv to tsv\SampleCSVFile_2kb.csv', 'r')
tsv = open('D:\csv to tsv\ggtsvFile.tsv', 'w')
for fileContent in csv:
    fileContent = re.sub(",", "\t", fileContent)
    print(fileContent)
    tsv.write(fileContent)
tsv.close()
Wednesday, 18 January 2017
Moulding
| Moulding | |
| It is obvious that when a thing made of clay comes before us, we take a different view of it, and our liking for it is increased in comparison to the mass of clay which it is made up of. Similarly, when a man approaches God after proper making of himself, He takes a different view of him. This goes to explain that we should effect such a making of ourselves as may help us to become the cynosure of His eyes. | |
Tuesday, 17 January 2017
list the files in directory based on extension using raw input-python
import os
def openfolder():
    path = raw_input("Enter path extension..")
    files = os.listdir(path)
    fe=raw_input("enter the extension u need...")
    for file in files:
        if file.endswith(fe):
            print(file)


openfolder()
to list the files and folders in the folders-PYTHON
import os
def openfolder():
    path = raw_input("Enter path..")
    files = os.listdir(path)
    for file in files:
        print(file)
openfolder()
Monday, 16 January 2017
Time
| Time | |
| Remember, time lost cannot be regained. There is an old saying which says, wealth lost can be easily rebuilt again. Health lost is a little more difficult, because each time you become healthy again you are a little less than before. Time lost is irrevocably lost. So every moment of time that you waste is something you will never recapture again; it’s gone into the limbo of the past, adding, brick by brick, to that house of future regret, which we must not build. | |
Society
| Society | |
| Change the individual, and society changes. Put one lamp in a dirty corner and there is a sphere of light. Put one candle in a dark room and the whole room is illuminated. There are simple means to achieving great aims, noble aims, desirable aims, necessary aims. | |
Purpose
| Purpose | |
| We each have our place in this universe, a unique place for every one of us. Never question the purpose for which you have been created. Try to find it. Try to fulfill it. That is what I believe is the final message of Sahaj Marg. | |
Thursday, 12 January 2017
Life's Race
| Life's Race | |
| Life is not one man's race. It is not a race where you start and you win or end. It is a permanent race, universal race, timeless race, like a relay race – four people running all around a course. The other four are waiting; as you come here, one gets ready and takes over the baton from your hand and runs the course, each generation handing over to the next generation. And until the last generation has run the last race and reached the target or the goal, we cannot say what humanity is going to achieve, what it has achieved or not achieved. | |
Wednesday, 11 January 2017
How To Find .Apk File Package Name And Launcher Activity Name
How To Find .Apk File Package Name And Launcher Activity Name
In previous step, we learnt about how to locate android native software app elements by XPath, ID and className and We will learn how to run your first android software app test in next step. But before creating your first android native software app, You must know how to find package name and launcher activity name of your android app which you are going to test using appium. Because we need to provide package name and launcher activity name of android software app in test script to launch it in device or emulator. This post will describe you how to get package name and launcher activity name of.APK file using different ways. More 2 methods of finding package name and launcher activity name are given on THIS PAGE.
PREREQUISITES : Previous appium tutorial's 10 STEPS should be completed.
Method 1 : Using APK Info App
If your android app is installed in device and you need it's package name and launcher activity name then you can use APK Info android app to get detailed information of any installed application. Let's try to get package name and launcher activity name of app called Contact Manager which i have installed. You can follow same steps for any app.
- Go to GOOGLE PLAY STORE, Search for app using keyword "APK Info".
- It will show you list of apps. There will be app with name APK info as shown in bellow image.

- Install this android software app in your android device.
- Alternatively you can download APKInfo app from THIS PAGE too.
- Launch APK info app in android device.

- It will show you list of all installed apps in your device. Locate Contact Manager android software app from list which is supplied by APK info app. Tap on Contact Manager app for 2 to 3 seconds.

- It will show you popup message as shown in bellow image. Select Detailed Information option.

- It will show you your Contact Manager app detail as shown in bellow image.

- See above image, APK path contains App Package name. So Package name for Contact Manager app is com.example.android.contactmanager and Activity Name for Contact Manager app is com.example.android.contactmanager.ContactManager.
Method 2 : Using Command Prompt
This is another way to get android app package and activity name. Let's try to get package name for Contact Manager app.
Get Package Name
- Connect your android phone with PC and turn on USB debugging mode as described in THIS POST.
- Open Command prompt.
- Run command adb shell pm list packages -f

- It will show you list of apps(Which are installed in your device) with package name.
- Find your app from list. It will show you package name as shown in bellow image.
- Bellow given image shows package name of Contact Manager app.

- Package name for Contact Manager app is com.example.android.contactmanager.
Method 3 : Using logcat In Command Prompt
- Connect your android phone with PC and turn on USB debugging mode.
- Open Command prompt.
- Run command adb logcat.

- Open app in android phone. Immediately press CTRL + C in command prompt to stop logging in command prompt.
- Android phone's latest activity will be logged in command prompt.
- If you see in log, It will show you app launcher log as shown bellow.

- Here com.example.android.contactmanager is package name and com.example.android.contactmanager.ContactManager is activity name of Contact Manager app.
This way you can get any android software application's package name and launcher activity name easily. We have to use both these parameters in test script.
Proper Living
| Proper Living | |
| Once you are born you have to die. The inevitability of it, even the avatars could not escape. The inevitability of something going towards death is old age; you cannot escape if you live long enough. And sickness much depends on you: how you live, what you eat, how you drink, on the conduct of life. | |
Tuesday, 10 January 2017
Locating Android App Elements Using UI Automator Viewer
Inspecting App's UI Element Using UI Automator Viewer
We will use default and simple calculator app of android phone to learn how to inspect its's UI elements using UI Automator Viewer tool. Follow the steps given bellow.


We will use default and simple calculator app of android phone to learn how to inspect its's UI elements using UI Automator Viewer tool. Follow the steps given bellow.
- Connect your android device with PC (USB debugging mode should be enabled) as described in THIS POST.
- Run command "adb devices" in command prompt to verify device is connected properly with PC.
- Run uiautomatorviewer.bat file from E:\SDK\tools folder. View THIS POST to know more about SDK folder. It will open UI Automator Viewer tool's UI as bellow.

- Open Calculator application in your android phone. You can download Android Calculator App from THIS PAGE if it is not available with you.

- In UI Automator Viewer software tool, Click on Device Screenshot image button as shown in bellow image. (Before clicking on button please make sure Calculator app is open in your android phone and it is in active mode. Means phone is unlocked and you are able to see Calculator app on screen).

- It will process to capture device screenshot.

- After capturing screenshot of android phone screen, It will show your android phone's calculator's UI in UI Automator Viewer as bellow.
- On left site it will show you calculator app's screenshot which is open in android device.
- Right side top part will show calculator app's UI element's hierarchy view. It will display node structure to explain how elements are arranged.
- Right side bottom part will show property detail of selected element.

- In calculator screenshot (which is display in UI Automator Viewer), Select button 5 to view it's different properties as shown in bellow image.

- It is showing different properties of button 5 in right side node detail section which we can use to locate it using different element locating strategy.
This way you can inspect any element of android native app using UI Automator Viewer software tool. You just need to click on element and it will show you that element's relative property detail.NEXT POST will show you different ways(XPath, id, className) to locate android app elements.
Connect Android Device With PC In USB Debugging Mode To Run Appium Test
Connect Android Device With PC In USB Debugging Mode To Run Appium Test
You need to connect real android device with PC in USB debugging mode in order to run android app automation tests in real android device using appium. Later on we will also learn how to run android app test in virtual device. First we will use actual android device which is connected with PC in USB debugging mode to run test. So you must know how to enable USB debugging mode in android device and connect with your PC.
Enable Developer Option In Android Device
Previously if you have not enabled "developer options" in your android device then once you need to enable it in order to switch device in USB debugging mode. Otherwise you can not access USB debugging mode in your device.
Verify Developer Option Is Enabled?
To check Developer Option is enabled or not,
- Go to Settings.
- Check if there is any option like "Developer Option"?
If Developer Option is enabled then it will display there. Otherwise follow the steps given bellow to enable it.
Enable Developer Option
To enable Developer Option in android device,
- Go to Settings.
- Scroll down to bottom and tap on About Phone.

- Scroll down bottom again on About Phone screen. You will see option Build number.
- Tap seven times on Build number option one by one. After 3 tap, It will start showing you message like.. "You are now 2 steps away from being a developer" as shown in bellow image.

- After 7 times Build number option tap, It will show you message "You are now a developer!" as shown in bellow image.

- Now go back to Settings and scroll down bottom.
- You will see option Developer Options above About Phone as shown in bellow image.

Connect Device With PC And Start USB Debugging Mode
Note : Let me warn you before enabling USB debugging mode in your android device. Enable USB debugging only when you need it. Leaving it enabled all the time is kind of a security risk as it allows high-level access to your android device. So disable it immediately when you have not any usage of it.
To start USB Debugging mode,
- Connect your device with PC using USB cable.
- Go to Settings -> Developer options.
- There will be option USB debugging with check box. Check it.

- It will ask you to "Allow USB debugging?". Tap on OK.

It will enable USB debugging mode for your android device.
Verify Device Connected Properly With PC
To verify device is connected properly with PC with USB debugging mode,
- Open command prompt in your PC.
- Run command adb devices.

It will show you list of connected devices with your PC. If not display any device in list that means there is some issue with device connection or USB debugging mode is not enabled properly.
Note : If face any issue in android device detecting with PC, Please install PDANet+ for Android in your system as described in THIS POST.
Note : If face any issue in android device detecting with PC, Please install PDANet+ for Android in your system as described in THIS POST.
This is the way to enable developer mode and USB debugging mode in your android device to connect it with PC in development environment. Now you can run native apps automation test in physical devices using appium and selenium webdriver. We will learn it in my upcoming posts. Next post will show you how to locate different elements of android native app using uiautomatorviewer.
Monday, 9 January 2017
Give and Become
| Give and Become | |
| Today's world is, give less and less, get more and more. But in the spiritual world, it is, give more and more without thinking of the self. So there is no getting at all. The more you give, the more you become | |
Steps To Install Eclipse ADT Plugin To Use Android SDK With Eclipse
PREREQUISITES
Bellow given tools/components should be available/installed
Steps to install ADT plugin in eclipse IDE.
- Open eclipse IDE
- Go to Help -> Install New Software. It will open Install software dialog.

- Click on Add button as shown in bellow image. It will open Add Repository dialog.

- Set URL "https://dl-ssl.google.com/android/eclipse/" in Location text box and click on OK button as shown in above snap. It will load Developer Tools with check box.
- Select all check box of developer tools as shown in bellow image and click on Next button. It will take you to installation details.

- Click on Next button as shown in bellow image. It will take you to Review Licenses screen.

- On Review Licenses screen, Select I accept the terms of the license agreement option and click on Finish button as shown bellow.

- It will start installing ADT plugin as shown bellow.

- On completion of ADT plugin, It will ask you to restart eclipse IDE. Click on Yes to restart eclipse IDE.

ADT Plugin is installed in eclipse
Set SDK Location
You need to set SDK folder path after installation of ADT plugin which enables eclipse to integrate with android software development environment. Follow the steps given bellow.
- Open eclipse IDE Preferences dialog from Windows -> Preferences.

- Select Android on Preferences dialog.
- Set SDK folder path in SDK Location box. SDK folder is located in my E: drive which contain all android SDK related stuff. View THIS POST for more detail on SDK folder.

Verify Android SDK configured properly with eclipse
To verify if android SDK is integrated properly or not
- Go to Eclipse IDE's Windows menu -> Select Android SDK Manager.

- It will open Android SDK Manager dialog as shown bellow.

This confirms that android SDK is integrated properly with eclipse IDE using ADT plugin.
How to download selenium and install Selenium Webdriver with Eclipse and Java Step By Step
Step 1 : Download and install Java in your system
First of all you need to install JDK (Java development kit) software in your system.
Step 2 : Download and install Eclipse
Download Eclipse for Java Developers and extract save it in any drive. It is totally free. You can run 'eclipse.exe' directly so you do not need to install Eclipse in your system.
Step 3 : Download WebDriver Jar Files.
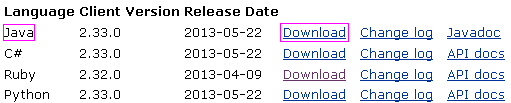
Selenium webdriver supports many languages and each language has its own client driver. Here we are configuring selenium 2 software with java so we need 'webdriver Java client driver'. Click here to go on WebDriver Java client driver download page for webdriver download file. On that page click on 'Download' link of java client driver as shown in bellow image.
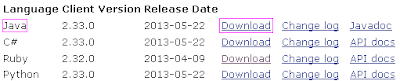
(language-specific client driver's version is changing time to time so it may be different version when you will visit download page. )
Downloaded 'webDriver Java client driver' will be in zip format. Extract and save it in your system at path D:\selenium-2.33.0. There will be 'libs' folder, 2 jar files and change log in unzipped folder as shown in bellow figure. We will use all these files for configuring webdriver in eclipse.

Step 4 : Start Eclipse and configure it with selenium 2 (webdriver)
After selecting workspace folder, Eclipse will be open.

Now your new created project 'testproject' will display in eclipse project explorer as bellow.

Now your Eclipse window will looks like bellow.
That's all about configuration of WebDriver software with eclipse. Now you are ready to write your test in eclipse and run it in WebDriver.
First of all you need to install JDK (Java development kit) software in your system.
Step 2 : Download and install Eclipse
Download Eclipse for Java Developers and extract save it in any drive. It is totally free. You can run 'eclipse.exe' directly so you do not need to install Eclipse in your system.
Step 3 : Download WebDriver Jar Files.
Selenium webdriver supports many languages and each language has its own client driver. Here we are configuring selenium 2 software with java so we need 'webdriver Java client driver'. Click here to go on WebDriver Java client driver download page for webdriver download file. On that page click on 'Download' link of java client driver as shown in bellow image.
(language-specific client driver's version is changing time to time so it may be different version when you will visit download page. )
Downloaded 'webDriver Java client driver' will be in zip format. Extract and save it in your system at path D:\selenium-2.33.0. There will be 'libs' folder, 2 jar files and change log in unzipped folder as shown in bellow figure. We will use all these files for configuring webdriver in eclipse.

Step 4 : Start Eclipse and configure it with selenium 2 (webdriver)
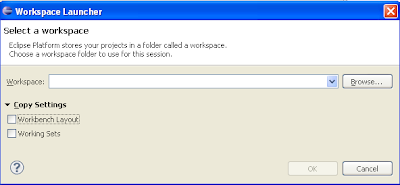
- Select WorkSpace on eclipse start up

After selecting workspace folder, Eclipse will be open.
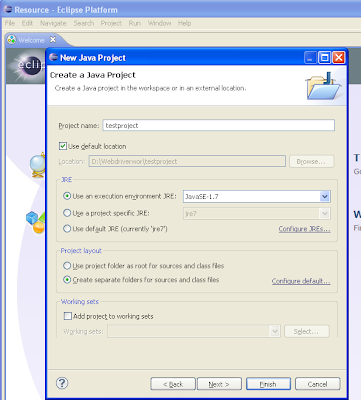
- Create new project


Now your new created project 'testproject' will display in eclipse project explorer as bellow.

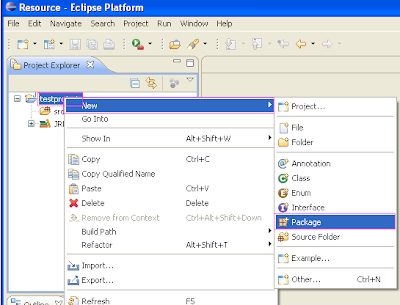
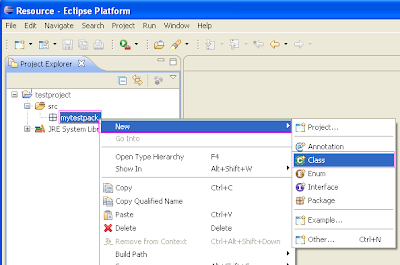
- Create new package

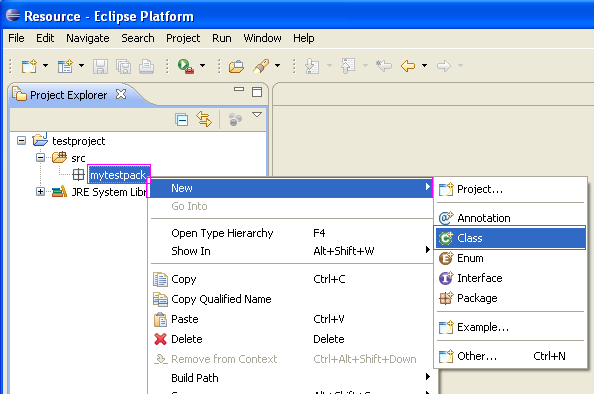
- Create New Class
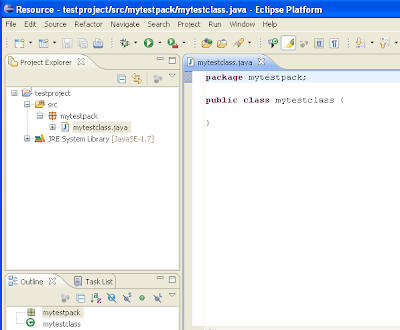
Now your Eclipse window will looks like bellow.

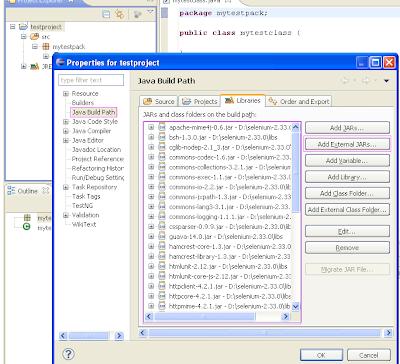
- Add external jar file to java build path
- Right click on project 'testproject' > Select Properties > Select Java build path > Navigate to Libraries tab
- Click on add external JARs button > select both .jar files from D:\selenium-2.33.0.
- Click on add external JARs button > select all .jar files from D:\selenium-2.33.0\libs
Now your testproject's properties dialogue will looks like bellow.

That's all about configuration of WebDriver software with eclipse. Now you are ready to write your test in eclipse and run it in WebDriver.
Subscribe to:
Posts (Atom)